
HTTP Server
基于 \Swoole\Http\Server 实现的协程 HTTP 服务, 框架层做了很好的封装, 用户按照传统的 MVC 方式编写代码, 就能获得协程带来的超高性能.
安装
Composer 安装
composer require swoft/http-server
Git 仓库
参与贡献
欢迎参与贡献,您可以
- fork 我们的开发仓库 swoft/component
- 修改代码然后发起 PR
- 阅读 提交代码 的注意事项
功能特色
- 基于
PSR-7的 HTTP 消息实现 - 基于
PSR-15的中间件 @Controller灵活的控制器注解@RequestMapping灵活的路由注解
Http 生命周期
了解请求生命周期, 有利于理解HTTP服务各组件, 编写出更好代码.
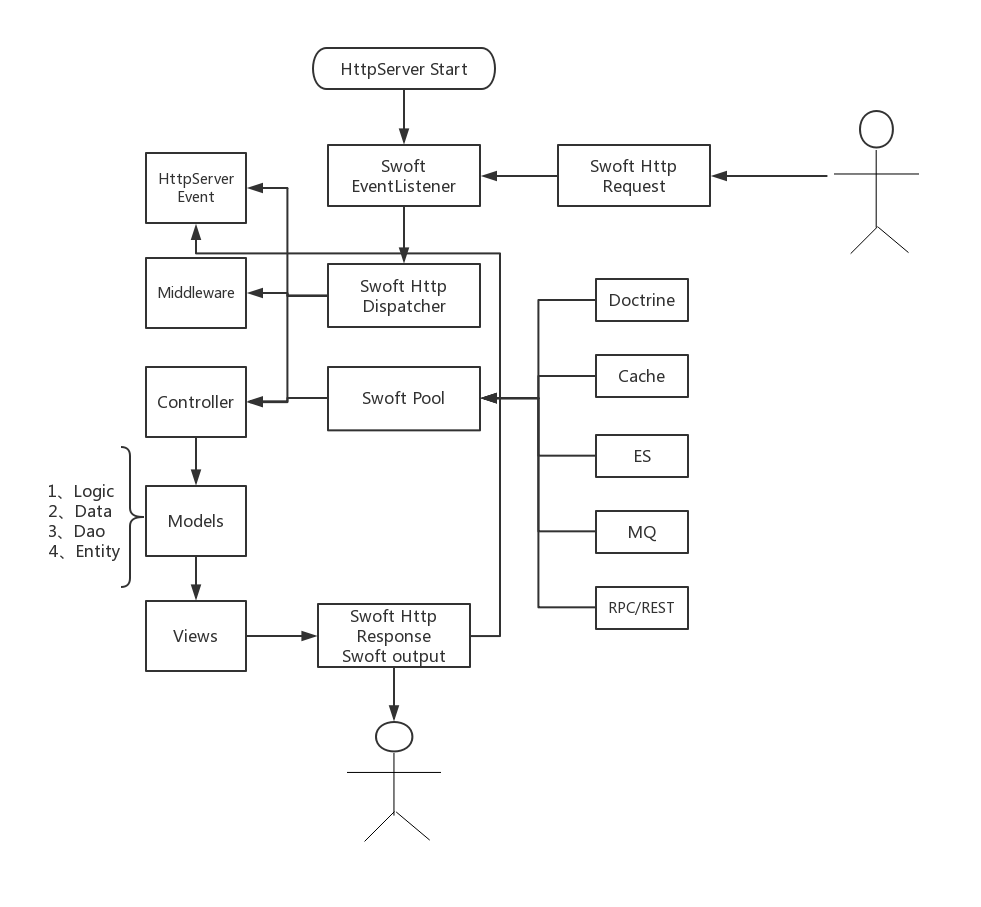
请求处理流程

Http Server 命令
$php bin/swoft http

Provide some commands to manage the swoft HTTP server

Group: http (alias: httpsrv)
Usage:
  bin/swoft http:COMMAND [--opt ...] [arg ...]

Global Options:
      --debug      Setting the application runtime debug level(0 - 4)
      --no-color   Disable color/ANSI for message output
  -h, --help       Display this help message
  -V, --version    Show application version information

Commands:
  reload      Reload worker processes
  restart     Restart the http server
  start       Start the http server
  stop        Stop the currently running server

Example:
 bin/swoft http:start     Start the http server
 bin/swoft http:stop      Stop the http server

View the specified command, please use: bin/swoft http:COMMAND -h
Http Server 的命令都在 Commands 中
reload重新加载工作进程restart重新启动http服务器start启动http服务器stop停止当前正在运行的服务器
使用
前台运行
$php bin/swoft http:start

                         Information Panel
***********************************************************************
* HTTP     | Listen: 0.0.0.0:18306, type: TCP, mode: Process, worker: 1
* rpc      | Listen: 0.0.0.0:18307, type: TCP
***********************************************************************

HTTP server start success !
后台运行
$php bin/swoft http:start -d

                         Information Panel
***********************************************************************
* HTTP     | Listen: 0.0.0.0:18306, type: TCP, mode: Process, worker: 1
* rpc      | Listen: 0.0.0.0:18307, type: TCP
***********************************************************************

HTTP server start success !
服务成功启动后访问 http://localhost:18306 即可访问 Http 服务
配置参数
在应用下的 app/bean.php 配置 server,在这个文件里,你可以看到 Http Server数组里面包含了 Http Server 的基本信息。下面列举了一些简单的配置,你也可以自由组合同时提供多种服务。
    'httpServer'        => [
        'class'    => HttpServer::class,
        'port'     => 18306,
        'listener' => [
            'rpc' => bean('rpcServer')
        ],
        'process'  => [
          //  'monitor' => bean(MonitorProcess::class)
          //  'crontab' => bean(CrontabProcess::class)
        ],
        'on'       => [
            // Enable task must task and finish event
            SwooleEvent::TASK   => bean(TaskListener::class),
            SwooleEvent::FINISH => bean(FinishListener::class)
        ],
        /* @see HttpServer::$setting */
        'setting' => [
            'task_worker_num'       => 12,
            'task_enable_coroutine' => true,
            'worker_num'            => 6,
            // Enable Https
            'ssl_cert_file' => '/my/certs/2288803_www.domain.com.pem',
            'ssl_key_file'  => '/my/certs/2288803_www.domain.com.key',
        ]
    ],
    //Enable Https
    'type' => SWOOLE_SOCK_TCP | SWOOLE_SSL,
可配置项用于 http server bean 配置,除了
class其他都是http server的属性。
class指定Http Server的处理类port指定Http Server的端口listener指定其他一同启动的服务,添加端口服务监听,可以多个。rpc启动RPC服务
process启动自定义用户进程on配置监听的事件- 注册事件、设置对应事件的处理监听,事件触发组件调用,在任务里面使用
setting这里是参考 Swoole Server 配置选项pidFile设置进程pid文件 位置,默认值@runtime/swoft.pidmode运行的模式,参考 Swoole Server 构造函数 第三个参数type指定Socket的类型,支持TCP、UDP、TCP6、UDP6、UnixSocket Stream/Dgram 等 Swoole Server 构造函数 第四个参数- 启用
Https支持 注意: 你必须安装OpenSSL库,并且确保安装swoole时是启用了ssl选项的。同时,需要设置'type' => SWOOLE_SOCK_TCP | SWOOLE_SSL
- 启用
Controller 控制器
控制器作为HTTP服务的核心组件,串接起一次请求的整个生命周期. 通过 注解 的方式,相较于传统的 Controller,代码更简洁,用户可以更关注业务逻辑。
创建控制器
主要通过 @Controller 注解实现。代码可以放置任意位置,不过为了统一标准,建议放在 app/Http/Controller 下
可以通过 swoftcli 快速创建新的控制器
php swoftcli.phar gen:http-ctrl user --prefix /users
@Controller 注解
Http 控制器类注解 @Controller
- 注解类:
Swoft\Http\Server\Annotation\Mapping\Controller - 作用范围:
CLASS - 拥有属性:
prefix指定路由前缀
通常仅有
@Controller是没有什么效果的,它需要配合接下来的@RequestMapping一起才能正确的工作。
路由规则
- 显式指定路由前缀:
@Controller(prefix="/index")或@Controller("/index")。 - 隐式指定路由前缀:
@Controller()默认自动使用小驼峰格式解析controller class的名称。- 示例:
class IndexController对应路由/index
- 示例:
@Controller + @RequestMapping 注解实现,通常前者定义前缀,后者定义后缀。关于 @RequestMapping 注解将在稍后 路由-@RequestMapping 章节将会详细介绍。示例: 根据下方的定义,对应的访问路由是 /v1/users/list (/v1/users + list)
/**
 * @Controller(prefix="/v1/users")
 */
class UsersController
{
    /**
     * @RequestMapping(route="list")
     */
    public function list(){}
}
示例: 若 @Controller() 参数为空,则会使用隐式路由前缀绑定,例如下方的定义,对应的访问路由是 /user/list
/**
 * @Controller()
 */
class UsersController
{
    /**
     * @RequestMapping(route="list")
     */
    public function list(){}
}
错误示范:
/**
 * @Controller()
 */
class BaseController
{
    protected $num;
}

/**
 * @Controller(prefix="/v1/index")
 */
class IndexController extends BaseController
{
    /**
     * @RequestMapping(route="index")
     */
    public function index()
    {
        $this->num++;
        echo $this->num."\n";
    }
}
路由
Swoft 与传统的 PHP 框架不一样,并没有采用配置文件的方式来配置路由,而采用了注解。在 Swoft 里我们可以使用 @RequestMapping 注解快速的添加路由。
路由配置
这是默认的路由配置
// at file: vendor/swoft/http-server/src/AutoLoader.php
'httpRouter' => [
    'name' => 'swoft-http-router',
    // config
    'ignoreLastSlash' => true,
    'tmpCacheNumber'  => 500,
    // 'handleMethodNotAllowed' => false
],
配置说明
ignoreLastSlashbool 默认:true是否忽略 URI path 最后的/- 如果设置为
false不忽略,/home与/home/将是两个不同的路由
- 如果设置为
tmpCacheNumberint 默认:500动态路由缓存数量。- 动态参数路由匹配后会缓存下来,下次相同的路由将会更快的匹配命中。
handleMethodNotAllowedbool 默认:false是否处理MethodNotAllowed- 为了加快匹配速度,默认
method不匹配也是直接抛出Route not found错误。如有特殊需要可以开启此选项,开启后将会抛出Method Not Allowed错误
- 为了加快匹配速度,默认
若你需要自定义路由配置,直接在 app/bean.php 添加 httpRouter 项配置即可。
'httpRouter'  => [
    'handleMethodNotAllowed' => true
]
@RequestMapping 注解
Http 控制器类中方法路由注解 @RequestMapping
route路由规则pathmethod请求方式(GET、POST、PUT、PATCH、DELETE、OPTIONS、HEAD)params可以通过它为path变量添加正则匹配限制
路由规则
- 通常情况,一个完整的路由
path等于@Controller的prefix+@RequestMapping的route- 显示指定路由后缀:
@RequestMapping("index")或@RequestMapping(route="index") - 隐式指定路由后缀: 使用
@RequestMapping()默认解析方法名为后缀
- 显示指定路由后缀:
- 特殊的,当你的
@RequestMapping上的路由以/开头时,那完整的路由就是它,即不会再将prefix添加到它的前面
示例: 在控制器方法中加入 @RequestMapping 注解
/**
 * @Controller()
 */
class UserController
{
    /**
     * @RequestMapping()
     */
    public function index()
    {}

    /**
     * @RequestMapping("index")
     */
    public function index()
    {}

    /**
     * @RequestMapping(route="index")
     */
    public function index()
    {}
}
代码执行后将会为 index 方法绑定路由为 /user/index,允许的请求方法为默认的 GET 和 POST。
绑定路由 path 参数
- 指定路由参数:
@RequestMapping(route="index/{name}"),Action 方法中可以直接使用$name作为方法参数 - 当路由参数被
[]包起来则 URL path 传递参数是可选的。注意,可选符只能用在最后面- 示例1:
@RequestMapping("/index[/{name}]")这样/index/index/tom都可以访问到 - 示例2:
@RequestMapping("/about[.html]")相当于伪静态,/about/about.html都可以访问到
- 示例1:
设置路由请求方式
如果想要设置允许请求控制器的 HTTP 请求方式。 可以使用方法在控制器中的 @RequestMapping 注解配置 method 参数,可以是 GET、POST、PUT、PATCH、DELETE、OPTIONS、HEAD 中的一个或多个。
- 限定
HTTP方法:@RequestMapping(method={RequestMethod::GET})指定路由支持的HTTP方法,默认是支持GET和POST
请切记要引入相关的注解类
Swoft\Http\Server\Annotation\Mapping\RequestMappingSwoft\Http\Server\Annotation\Mapping\RequestMethod
获取匹配结果
你可以在中间件或者 action 拿到路由匹配的结果信息。
[$status, $path, $route] = $request->getAttribute(Request::ROUTER_ATTRIBUTE);
Http 请求对象
Swoft 的请求与响应实现于 PSR-7 规范。请求与响应对象存在于每次 HTTP 请求。
- 请求对象
Request为Swoft\Http\Message\Request - 响应对象
Response为Swoft\Http\Message\Response
PSR-7 接口为请求和响应对象提供了这些公共方法:
withProtocolVersion($version)withHeader($name, $value)withAddedHeader($name, $value)withoutHeader($name)withBody(StreamInterface $body)
PSR-7 接口为请求对象提供了这些方法:
withMethod(string $method)withUri(UriInterface $uri, $preserveHost = false)withCookieParams(array $cookies)withQueryParams(array $query)withUploadedFiles(array $uploadedFiles)withParsedBody($data)withAttribute($name, $value)withoutAttribute($name)
更多请参考 PSR-7 和 查看 swoft/http-message 中具体的实现类
获取请求对象
- 通过控制器方法参数注入
public function action(Request $request) - 通过请求上下文获取
Swoft\Context\Context::mustGet()->getRequest()
示例: 获取请求动作
$request = context()->getRequest();
$method = $request->getMethod();
示例: 获取请求的 URI
每个 HTTP 请求都有一个 URI 标识所请求的应用程序资源。HTTP 请求 URI 有几个部分:
Scheme(e.g. http or https)Host(e.g. example.com)Port(e.g. 80 or 443)Path(e.g. /users/1)Querystring (e.g. sort=created&dir=asc)
你可以通过请求对象的 getUri() 方法获取 PSR-7 URI对象:
$method = $request->getUri();
PSR-7 请求对象的 URI 本身就是一个对象,它提供了下列方法检查 HTTP 请求的 URL 部分
getScheme()getAuthority()getUserInfo()getHost()getPort()getPath()getQuery() (e.g. a=1&b=2)getFragment()
示例: 获取请求 Headers
全部的 Headers
$headers = $request->getHeaders();

foreach ($headers as $name => $values) {
    echo $name . ": " . implode(", ", $values).PHP_EOL;
}
指定的 Header
$headerValueArray = $request->getHeader('host');
print_r($headerValueArray); // return Array
$host = $request->getHeaderLine("host");
print_r($host); // return String
示例: 获取请求的数据
GET 数据
$data = $request->query();
$some = $request->query('key', 'default value')
$data = $request->get();
$some = $request->get('key','default value');
POST 数据
$data = $request->post();
$some = $request->post('key', 'default value')
无需关心请求的数据格式,
jsonxml请求都会自动解析为php的数组数据。都可以通过$request->post()获取。
GET & POST 数据
$data = $request->input();
$some = $request->input('key', 'default value')
RAW 数据
$data = $request->raw();
SERVER 数据
$data = $request->getServerParams();
$some = $request->server('key', 'default value')
获取上传文件
$file = $request->getUploadedFiles();
获取的结果是一维数组或者二位数组,数据结构如下。 若表单中上传的是单文件则返回的是一个一维数组,数组内容是 Swoft\Http\Message\Upload\UploadedFile 文件对象,例如文件字段名为 file 则数据结构如下
array(1) {
  ["file"]=>
  object(Swoft\Http\Message\Upload\UploadedFile)#6510 (7) {
    ["size":"Swoft\Http\Message\Upload\UploadedFile":private]=>
    int(1319)
    ["errorCode":"Swoft\Http\Message\Upload\UploadedFile":private]=>
    int(0)
    ["file":"Swoft\Http\Message\Upload\UploadedFile":private]=>
    string(25) "/tmp/swoole.upfile.f7p2EL"
    ["clientFilename":"Swoft\Http\Message\Upload\UploadedFile":private]=>
    string(6) "at.png"
    ["clientMediaType":"Swoft\Http\Message\Upload\UploadedFile":private]=>
    string(9) "image/png"
    ["moved":"Swoft\Http\Message\Upload\UploadedFile":private]=>
    NULL
    ["path":"Swoft\Http\Message\Upload\UploadedFile":private]=>
    NULL
  }
}
若表单中是一个字段数组上传多个文件如 file[] 则返回的是一个二维数组,数组内容依然是 Swoft\Http\Message\Upload\UploadedFile 文件对象,数据结构如下
array(1) {
  ["file"]=>
  array(2) {
    [0]=>
    object(Swoft\Http\Message\Upload\UploadedFile)#6516 (7) {
      ["size":"Swoft\Http\Message\Upload\UploadedFile":private]=>
      int(1319)
      ["errorCode":"Swoft\Http\Message\Upload\UploadedFile":private]=>
      int(0)
      ["file":"Swoft\Http\Message\Upload\UploadedFile":private]=>
      string(25) "/tmp/swoole.upfile.TVKdOS"
      ["clientFilename":"Swoft\Http\Message\Upload\UploadedFile":private]=>
      string(6) "at.png"
      ["clientMediaType":"Swoft\Http\Message\Upload\UploadedFile":private]=>
      string(9) "image/png"
      ["moved":"Swoft\Http\Message\Upload\UploadedFile":private]=>
      NULL
      ["path":"Swoft\Http\Message\Upload\UploadedFile":private]=>
      NULL
    }
    ...
  }
}
文件操作方法
moveTo()将上传的文件移动到新位置。getSize()获取文件大小,单位byte。getError()获取上传文件相关的错误信息,若无错将必须返回UPLOAD_ERR_OK常量,若又错误将返回UPLOAD_ERR_XXX相关常量。getClientFilename()获取文件上传时客户端本地的文件名,不要相信此方法返回的值。客户端可能会发送恶意虚假文件名,意图破坏或破解您的应用程序。getClientMediaType()获取客户端中文件的MediaType类型,不要相信此方法返回的值。客户端可能会发送恶意虚假文件名,意图破坏或破解您的应用程序。
其他辅助方法
if ($request->isAjax()) {
    // Do something
}
if ($request->isXmlHttpRequest()) {
    // Do something
}
if ($request->isGet()) {
    // Do something
}
if ($request->isPost()) {
    // Do something
}
if ($request->isPut()) {
    // Do something
}
if ($request->isDelete()) {
    // Do something
}
if ($request->isPatch()) {
    // Do something
}
$contentType = $request->getContentType();
Http 响应对象
Swoft 的请求与响应实现于 PSR-7 规范。请求与响应对象存在于每次 HTTP 请求。
- 请求对象
Request为Swoft\Http\Message\Request - 响应对象
Response为Swoft\Http\Message\Response
PSR-7 接口为请求和响应对象提供了这些公共方法:
withProtocolVersion($version)withHeader($name, $value)withAddedHeader($name, $value)withoutHeader($name)withBody(StreamInterface $body)
PSR-7 接口为响应对象提供了这些方法:
withStatus($code, $reasonPhrase = '')
更多请参考 PSR-7 和 查看 swoft/http-message 中具体的实现类
获取响应对象
- 通过控制器方法参数注入 (
Response $response) - 通过请求上下文获取
context()->getResponse() - 通过请求上下文获取
Swoft\Context\Context::mustGet()->getResponse()(已废弃)
示例: 设置响应状态码
$response = \context()->getResponse();
return $response->withStatus(404);
示例: 输出字符串内容响应
return $response->withContent("Hello Swoft2.0");
示例: 输出数组内容响应
$data = ['name'=>'Swoft2.0'];
$response->withData($data);
示例: 设置响应头信息
return $response->withHeader("name","Swoft2.0");
示例: 重定向
// 302
return $response->redirect("http://www.swoft.org",302);

// 404 page
return $response->redirect('/404');
示例: 文件下载
return $response->file(\alias('@runtime/1.zip'), "application/octet-stream");
示例: 设置 Cookies
$response = $response->withCookie(’name', 'value');

$response = $response->withCookie(’name', [
    'value'    => 'value3',
    'httpOnly' => true
]);

$cookies = [
    'key1' => 'value1',
    'key2' => [
        'value' => 'value2',
    ],
    'key3' => [
        'value'    => 'value3',
        'httpOnly' => true
    ],
];

$response = $response->withCookies($cookies);
中间件
中间件是用于控制 请求到达 和 响应请求 的整个流程的,通常用于对请求进行过滤验证处理,当你需要对请求或响应作出对应的修改或处理,或想调整请求处理的流程时均可以使用中间件来实现。
定义中间件
只需要实现了 Swoft\Http\Server\Contract\MiddlewareInterface 接口均为一个合法的中间件,其中 process() 方法为该中间件逻辑处理方法。
namespace App\Http\Middleware;
use Psr\Http\Message\ResponseInterface;
use Psr\Http\Message\ServerRequestInterface;
use Psr\Http\Server\RequestHandlerInterface;
use Swoft\Bean\Annotation\Mapping\Bean;
use Swoft\Http\Server\Contract\MiddlewareInterface;
/**
 * @Bean()
 */
class ControllerMiddleware implements MiddlewareInterface
{
    /**
     * Process an incoming server request.
     *
     * @param ServerRequestInterface $request
     * @param RequestHandlerInterface $handler
     *
     * @return ResponseInterface
     * @inheritdoc
     */
    public function process(ServerRequestInterface $request, RequestHandlerInterface $handler): ResponseInterface
    {
        $response = $handler->handle($request);
        return $response;
    }
}
配置全局中间件
当你的自定义中间件需要全局请求应用,则可以考虑将此中间件作为全局中间件去使用,只需在 Bean 配置文件内配置 httpDispatcher 的 middlewares 属性,在数组中加入你的自定义中间件的命名空间地址,相关配置通常在 app/bean.php 内。
return [
    ...
    'httpDispatcher'=>[
        'middlewares'=>[
            AuthMiddleware::class,
            ApiMiddleware::class
        ]
    ]
    ...
]
通过注解使用
通过 @Middleware 和 @Middlewares, 可以很方便的配置中间件到当前的 Controller 和 Action 内。
- 当将此注解应用于
Controller上,则作用域为整个Controller - 将此注解应用于
Action上,则作用域仅为当前的Action @Middleware用于配置单个中间件@Middlewares是用于配置一组@Middleware,按照定义顺序依次执行namespace App\Http\Controller; use App\Http\Middleware\ApiMiddleware; use App\Http\Middleware\IndexMiddleware; use App\Http\Middleware\ControllerMiddleware; use Swoft\Http\Server\Annotation\Mapping\Controller; use Swoft\Http\Server\Annotation\Mapping\Middleware; use Swoft\Http\Server\Annotation\Mapping\Middlewares; use Swoft\Http\Server\Annotation\Mapping\RequestMapping; /** * @Controller() * @Middlewares({ * @Middleware(ApiMiddleware::class), * @Middleware(ControllerMiddleware::class) * }) */ class MiddlewareController { /** * @RequestMapping() * @Middleware(IndexMiddleware::class) */ public function index(){ return "MiddlewareController"; } }
注意:记得要引入对应的中间件类
应用
示例: 提前拦截请求。
拦截要在
$handler->handle($request)之前
namespace App\Http\Middleware;
use Psr\Http\Message\ResponseInterface;
use Psr\Http\Message\ServerRequestInterface;
use Psr\Http\Server\RequestHandlerInterface;
use Swoft\Bean\Annotation\Mapping\Bean;
use Swoft\Context\Context;
use Swoft\Http\Server\Contract\MiddlewareInterface;
/**
 * @Bean()
 */
class SomeMiddleware implements MiddlewareInterface
{

    /**
     * Process an incoming server request.
     * @param ServerRequestInterface $request
     * @param RequestHandlerInterface $handler
     * @return ResponseInterface
     * @inheritdoc
     */
    public function process(ServerRequestInterface $request, RequestHandlerInterface $handler): ResponseInterface
    {
        $path = $request->getUri()->getPath();

        if ($path === '/favicon.ico') {
            $response = Context::mustGet()->getResponse();
            return $response->withStatus(404);
        }
        return $handler->handle($request);
    }
}
示例: 跨域设置
namespace App\Http\Middleware;
use Psr\Http\Message\ResponseInterface;
use Psr\Http\Message\ServerRequestInterface;
use Psr\Http\Server\RequestHandlerInterface;
use Swoft\Bean\Annotation\Mapping\Bean;
use Swoft\Http\Server\Contract\MiddlewareInterface;

/**
 * @Bean()
 */
class CorsMiddleware implements MiddlewareInterface
{
    /**
     * Process an incoming server request.
     * @param ServerRequestInterface $request
     * @param RequestHandlerInterface $handler
     * @return ResponseInterface
     * @inheritdoc
     */
    public function process(ServerRequestInterface $request, RequestHandlerInterface $handler): ResponseInterface
    {
        if ('OPTIONS' === $request->getMethod()) {
            $response = Context::mustGet()->getResponse();
            return $this->configResponse($response);
        }
        $response = $handler->handle($request);
        return $this->configResponse($response);
    }

    private function configResponse(ResponseInterface $response)
    {
        return $response
            ->withHeader('Access-Control-Allow-Origin', 'http://mysite')
            ->withHeader('Access-Control-Allow-Headers', 'X-Requested-With, Content-Type, Accept, Origin, Authorization')
            ->withHeader('Access-Control-Allow-Methods', 'GET, POST, PUT, DELETE, PATCH, OPTIONS');
    }
}
示例: JWT 登录验证
namespace App\Http\Middleware;

use Psr\Http\Message\ResponseInterface;
use Psr\Http\Message\ServerRequestInterface;
use Psr\Http\Server\RequestHandlerInterface;
use Swoft\Bean\Annotation\Mapping\Bean;
use Swoft\Context\Context;
use Swoft\Http\Server\Contract\MiddlewareInterface;

/**
 * @Bean()
 */
class AuthMiddleware implements MiddlewareInterface
{
    /**
     * Process an incoming server request.
     * @param ServerRequestInterface $request
     * @param RequestHandlerInterface $handler
     * @return ResponseInterface
     * @inheritdoc
     */
    public function process(ServerRequestInterface $request, RequestHandlerInterface $handler): ResponseInterface
    {
        // before request handle
        // 判断token
        $token = $request->getHeaderLine("token");
        $type = \config('jwt.type');
        $public = \config('jwt.publicKey');
        try {
            $auth = JWT::decode($token, $public, ['type' => $type]);
            $request->user = $auth->user;
        } catch (\Exception $e) {
            $json = ['code'=>0,'msg'=>'授权失败']
            $response = Context::mustGet()->getResponse();
            return $response->withData($json);
        }
        $response = $handler->handle($request);
        return $response;
        // after request handle
    }
}
异常处理
通常我们把异常类放置 app/Exception ,异常类处理器放置 app/Exception/Handler 异常分为两部分。自定义的 Exception 异常类,异常处理类 ExceptionHandler。
定义异常类
在不同应用场景下,定义不同的异常类,例如需要一个控制器抛异常的类。
namespace App\Exception;
class ApiException extends \Exception
{

}
定义异常处理类
namespace App\Exception\Handler;
use App\Exception\ApiException;
use Swoft\Error\Annotation\Mapping\ExceptionHandler;
use Swoft\Http\Message\Response;
use Swoft\Http\Server\Exception\Handler\AbstractHttpErrorHandler;
/**
 * @ExceptionHandler(ApiException::class)
 */
class ApiExceptionHandler extends AbstractHttpErrorHandler
{
    /**
     * @param \Throwable $e
     * @param Response $response
     * @return Response
     * @throws \ReflectionException
     * @throws \Swoft\Bean\Exception\ContainerException
     */
    public function handle(\Throwable $e, Response $response): Response
    {
        $data = ['code'=>-1,'msg'=>$e->getMessage()];
        return $response->withData($data);
    }
}
@ExceptionHandler 注解
异常处理程序,指定这个处理器要处理当异常,当程序抛出 ExceptionHandler 注解里有的异常时,将会自动执行 handle 方法。
- 指定异常:参数可以是字符串也可以是数组
- 示例: 处理一个异常
@ExceptionHandler(ApiException::class) - 示例: 处理多个异常
@ExceptionHandler({ApiException::class,ServiceException::class})
- 示例: 处理一个异常
Http 客户端
官方建议使用 saber 和 Guzzle ,不再重复造轮子。
Saber
Swoole 官方封装的 Http client 库,已在多个大型项目中使用。
安装
composer require swlib/saber
使用
SaberGM::get('http://httpbin.org/get');
SaberGM::delete('http://httpbin.org/delete');
SaberGM::post('http://httpbin.org/post', ['foo' => 'bar']);
SaberGM::put('http://httpbin.org/put', ['foo' => 'bar']);
SaberGM::patch('http://httpbin.org/patch', ['foo' => 'bar']);
Guzzle
Guzzle 老牌 HTTP 封装库,很多依赖都是它封装的。
安装
composer require guzzlehttp/guzzle
使用
$client = new \GuzzleHttp\Client();
$response = $client->request('GET', 'https://api.github.com/repos/guzzle/guzzle');

echo $response->getStatusCode(); # 200
echo $response->getHeaderLine('content-type'); # 'application/json; charset=utf8'
echo $response->getBody(); # '{"id": 1420053, "name": "guzzle", ...}'